Following my article on creating custom widgets for the Elementor page builder, I now discuss how to create custom skins for an Elementor widget.
What’s a “skin” in Elementor?
It’s a way to offer several skins (appeareances) for the same widget.
For example, in the Pro version of Elementor, the “Posts” widget offers three skins: “Classic”, “Card” and “Full Content”.
In all three cases the widget always has the same role: displaying posts, what changes is only its appearance.
Skins also allow you to add custom controls per skin, but also to modify a widget’s controls.
The different ways to create custom skins
There are two methods:
- Using a plugin, for example “Elementor Custom Skin” on the official directory. It allows you to create loop templates and use them as skins. However, you will be limited to the Posts widgets.
- Creating your plugin, and this is the subject of this article.
Anatomy of a widget
Before getting to the point, I think it’s important to remember how an Elementor widget is built:
It’s a class, written in PHP, that extends another Elementor class: Widget_Base.
In this class we find several functions, some of them are essential like :get_name, get_title, register_controls, and… render.
Let’s focus on the latter, the render function, which is responsible for rendering the widget. If the skins of a widget allow to control its display, then the render function of the widget is not used.
And indeed, when we look at the code of the Posts widget, we realize that the render function of the Posts_Base class is empty, and that the Posts class has no render function at all. On the other hand, we find another function: register_skins, which will load the three available skins for this widget: Classic, Cards and Full Content.
In short, if a widget has skins, then the widget’s render function is not mandatory.
Create a skin for an existing widget
In this article we will create a skin called “Simple” for the Button widget.
Let’s give ourselves several objectives in order to explore different features:
- Add controls to our skin: we imagine we need to add custom HTML attributes to our link and will add controls to do so
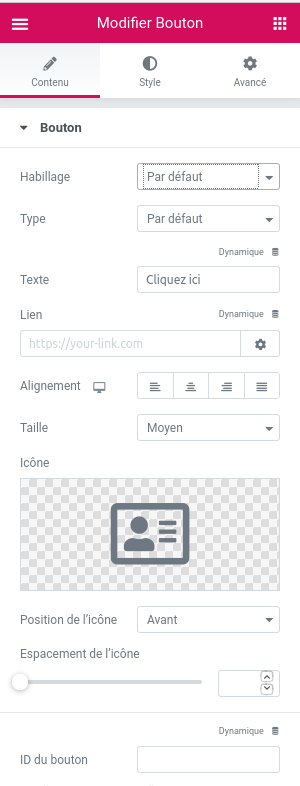
- Manipulate the widget controls: we will disable the “Icon” control
- Manage the rendering of the skin: for the example we will lighten the HTML code of the native Button widget and display our controls created in #1
Create your plugin
First of all we have to create a plugin to place our skin. You can download the sample extension on my GitHub and install it normally via the dashboard. Once activated, you’ll see a new skin selector in the Button widget.
Plugin structure
- the /skins folder contains one folder per widget, each contains one file per skin :
- /button/skin-simple.php: the PHP class of our skin for the Button widget
- elementor-custom-skins.php : the main plugin gile, I don’t dwell on it, it allows to declare different constants, load translations, check the existence of Elementor, and finally load the following file : plugin.php
- plugin.php : the file that will load our skins, it contains several functions :
include_skins_files: includes the skins fileselementor_init: starts the inclusion of skin files and declares them to Elementor on theelementor/widget/{$widget_name}/skins_inithook,{$widget_name}being replaced by the id of the widget for which we are adding a skin (button).
Within this function, we use theadd_skinmethod of theWidget_Baseclass ($widget) to actually add our skin to the widget. This method takes the instance of the skin class as a parameter.__construct: add ourelementor_initfunction on theelementor/inithook, at this point the Elementor widgets are loaded, so we can launch our own code.
Create a skin
The creation of a skin is done via a PHP class that extends the Elementor Skin_Base class (located in elementor/includes/base/skin-base.php). It is quite similar to the creation of a widget, in fact we find several similar functions:
get_id: declares the (unique) identifier of our skinget_title: declares the name displayed in the interface (“Simple”)render: displays the widget’s render, it overrides the widget’s render function
We also have add_controls, update_controls, and __construct. We will see them in this order to accomplish our 3 goals.
Adding controls to a skin
Let’s imagine that we want to add custom HTML attributes to our buttons, whose value is manageable, for example for tracking purposes. The final result will be the following:<a href="https://example.com" attribut="test">Click here</a>
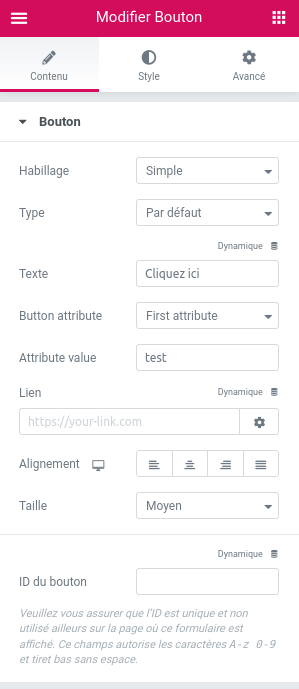
We are going to propose a selector to choose which attribute to add to the link, and a text field to fill in the value of the attribute.
So we need to add two new controls, only available for our custom skin: a selector and a text field. We do this in the add_controls function, starting with an injection before the “Link” control of the Button :
$this->parent->start_injection( [
'at' => 'before',
'of' => 'link',
] );Code language: PHP (php)The start_injection function allows you to target precisely where you want to add one or more controls by specifying the position (at): before or after, relative to an identifier of an existing control (of). Here I declare that I want to start my injection before the “Link” control which has the link identifier.
Now that the injection has started, we can add our two controls:
$this->add_control(
	'button_custom_attr',
	[
		'label' => __( 'Button attribute', 'elementor-custom-skins' ),
		'type' => Controls_Manager::SELECT,
		'default' => '',
		'options' => [
			'' => __( 'None', 'elementor-custom-skins' ),
			'first-attr' => __( 'First attribute', 'elementor-custom-skins' ),
			'second-attr' => __( 'Second attribute', 'elementor-custom-skins' )
		]
	]
);
$this->add_control(
	'button_custom_attr_value',
	[
		'label' => __( 'Attribute value', 'elementor-custom-skins' ),
		'type' => Controls_Manager::TEXT,
		'default' => '',
	]
);Code language: PHP (php)
The select allows you to choose which attribute to add to our button and the a text field allows you to enter the value of the attribute.
If you would like to know more about how the controls work, you can find documentation on the official Elementor website.
Finally, we finish our injection: $this->parent->end_injection();
Note that we do our injection on the parent, i.e. the button widget ($this->parent), and add our controls on the skin ($this).
I use injection for the example, but it is quite possible to create one or more sections (link to the documentation).
You now know how to add controls only available for a skin, we will see later how to display them.
Manipulating the widget controls
You saw it in the previous section: from a skin, we have access to the parent widget (here the button). So we can manipulate its controls via our skin.
In the update_controls function, we will hide the control that allows us to select the button icon using the Elementor update_control function :
$this->parent->update_control(
	'selected_icon',
	[
		'condition' => [
			'_skin!' => 'skin-simple',
		],
	]
);Code language: PHP (php)
Again, we act on the parent widget ($this->parent), and in the update_control function we add a condition telling it to display only if the skin is different from our “Simple” skin.
The same goes for the “Icon align” (icon_align) and “Icon spacing” (icon_indent) controls: they will be hidden if the selected skin ID is not “skin-simple“.
Note that the update_control function allows you to modify the parameters of any control, even outside of a skin.
Manage skin rendering
As we saw earlier, when a widget has skins and one of them is selected, it is the rendering of the skin that takes precedence over the rendering of the widget via the render function.
Here for the example, I simply copied the render function from the Button widget with a few modifications:
- I replaced the calls to
$thisby$this->parentfor all settings since they are located in the widget and not in the skin - I removed everything related to the icon display since we removed that control
- I added the display of our custom attribute :
// get skin settings values
$button_custom_attr = $this->get_instance_value( 'button_custom_attr' );
$button_custom_attr_value = $this->get_instance_value( 'button_custom_attr_value' );

// add button attributes from skin settings values
if ( ! empty( $button_custom_attr ) && ! empty( $button_custom_attr_value ) ) {
	$this->parent->add_render_attribute( 'button', $button_custom_attr, $button_custom_attr_value );
}Code language: PHP (php)
Note that to access the values of the controls in a skin, you use the get_instance_value function, unlike widgets, for which you use the get_settings function.
On their own, our 3 functions won’t display anything, you have to use hooks to tell Elementor that you’re having fun with your button.
To do this, we place ourselves in the __construct function which is launched at the initialization of our class, and we use a very handy Elementor hook because it allows us to choose exactly where to place ourselves:
elementor/element/{$widget}/{$section_id}/before_section_end
In this hook, two portions are dynamic: “widget” , “section_id” . (link to the official documentation)
In our case we use it twice:
The first time to add our controls (function _controls) on the Button widget (which has the button id), in the main section (which has the section_button id), before the end of the section (before_section_end).
A second time to update our controls after the end of the section (after_section_end).
The final result in the editor is the following: on the left the original button and on the right with our skin :
It’s not very impressive, I admit ;-), but you now have the basics for creating skins to customize the rendering of Elementor native widgets.
For my part, I use skins on a daily basis to better manage the different widget displays without creating a too heavy interface in the editor: showing controls only for a particular skin.
I also use them to modify the HTML rendering of Elementor widgets, which sometimes doesn’t suit in terms of accessibility, semantics, etc. I also use them to modify the HTML rendering of Elementor widgets.
Create a skin for your own widgets
To propose skins in your own widgets the logic remains the same as above.
However, you must use the _register_skins function in the widget instead of the action in the existing widget (elementor/widget/{$widget_name}/skins_init), for example in the “Posts” widget in Elementor Pro :
protected function _register_skins() {
	$this->add_skin( new Skins\Skin_Classic( $this ) );
	$this->add_skin( new Skins\Skin_Cards( $this ) );
	$this->add_skin( new Skins\Skin_Full_Content( $this ) );
}Code language: PHP (php)

5 responses to “Create custom skins for an Elementor widget”
Thank you, exactly what I was looking for 🙂
Thanks Marie! Could you get in touch about adding another skin to the search form pls?
Thank you very much for this great example. I will use it for my first custom Elementor skin.
Thanks!
Thank You so much